
Ikea Kalax Media Unit Hack
- Dale Wedge

- Mar 3, 2019
- 7 min read
Updated: Jan 18, 2022
I have a great Ikea hack for you guys today!! This one is my favorite, and Curtis and I have hacked a lot of Ikea stuff in our years together. The reason this one is my fave is because you would never know that this was a piece of Ikea furniture to start with!

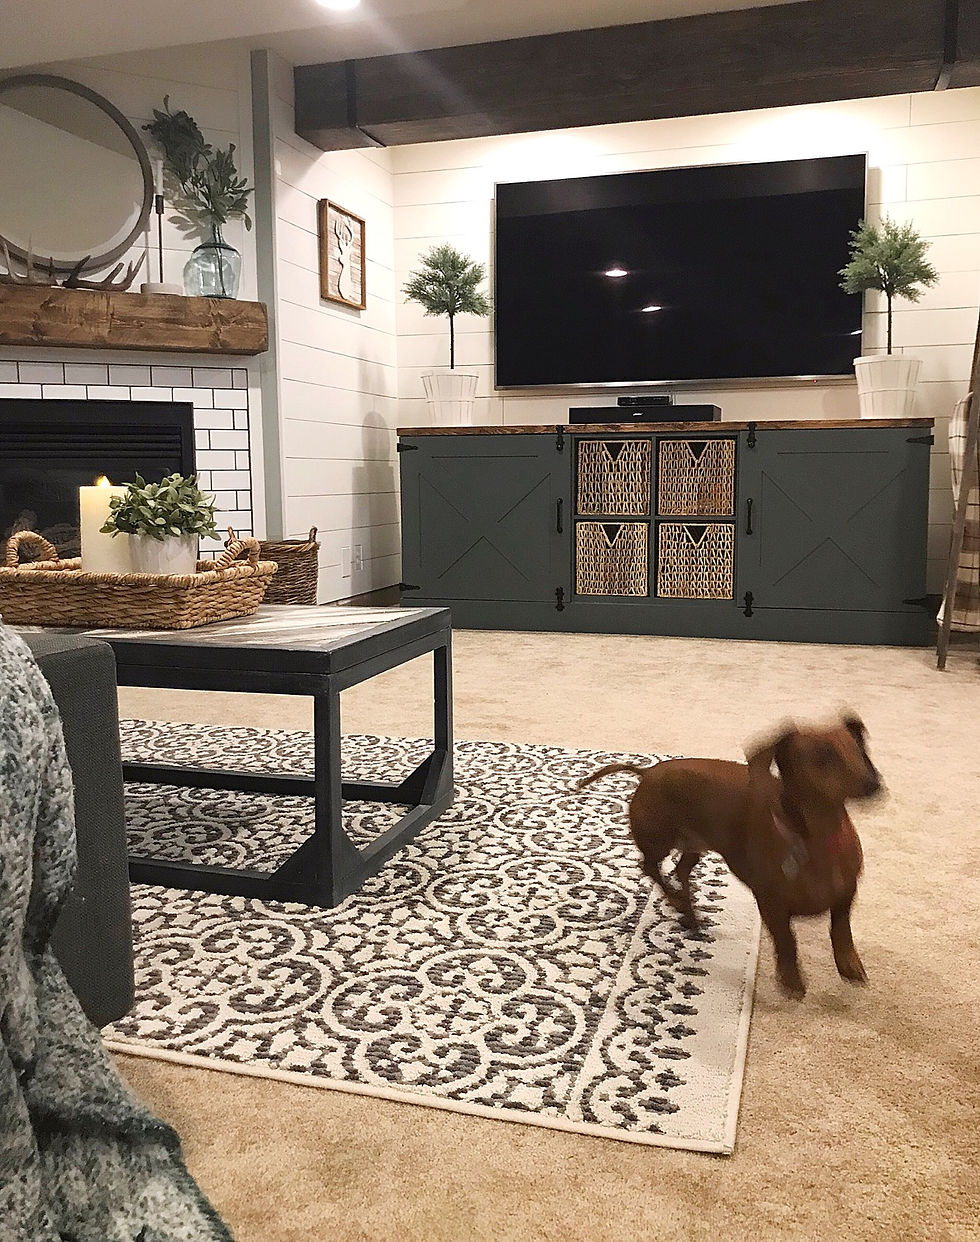
We needed a TV console to go under our new 75" television, but finding anything that big was going to be very expensive. I already had 2 Ikea Kalax units under the TV for storage, but it looked lost and didn't provide much of a focal point to distract away from the giant black box above. I looked at the units one day whilst binge watching Outlander and thought to myself maybe there's a way to use these Ikea units and make them more substantial with some new trim or perhaps a chunky wood top even?!! So that's what we did guys, we beefed up the two units big time, and now we have the perfect over sized piece of furniture that looks like something we paid a lot of money for, but in reality we spent around $300 to build this entire unit and that includes the 2 Kalax units from Ikea! Okay, let's get started shall we....
What you will need (this list will vary depending on the size of unit you will want to make):
1 Ikea Kalax 4 cube unit, (what I used)
1 Ikea Kalax 8 cube unit, (what I used)
2x4" pine boards for the feet
plywood or MDF for the doors, decide how much you need depending how big you want your unit to be.
wood screws
wood glue
4 mm pre-sanded plywood or sub floor, this is for the side outer walls and trim for the doors
MDF base trim, get the width you need depending on how much higher you want your unit to be.
cabinet pulls or handles in your choice
PL Construction Adhesive
Pine tongue and groove flooring or bead board in the length of your unit (to close in back)
Wood stain, here is the one I used
Chalk Paint or furniture paint
Good Primer, I used this one
Minwax Polycrylic (to seal the chalk paint)
Paint brush
4" paint roller
Paint trays
*Instagram video here on the process
Step 1 :
First thing we did was build our feet for the units. These feet are what's going to make the unit taller. Decide how tall you want your console to be and then add the extra height in the feet, we went with 5" high for the feet. We made 5 sets of the feet. We did this by drilling 2x4's together and using plywood as cross sections to almost make a U shaped foot. You could also use 4x4's for the feet, we just used 2x4's because it's what we had on hand.


Step 2:
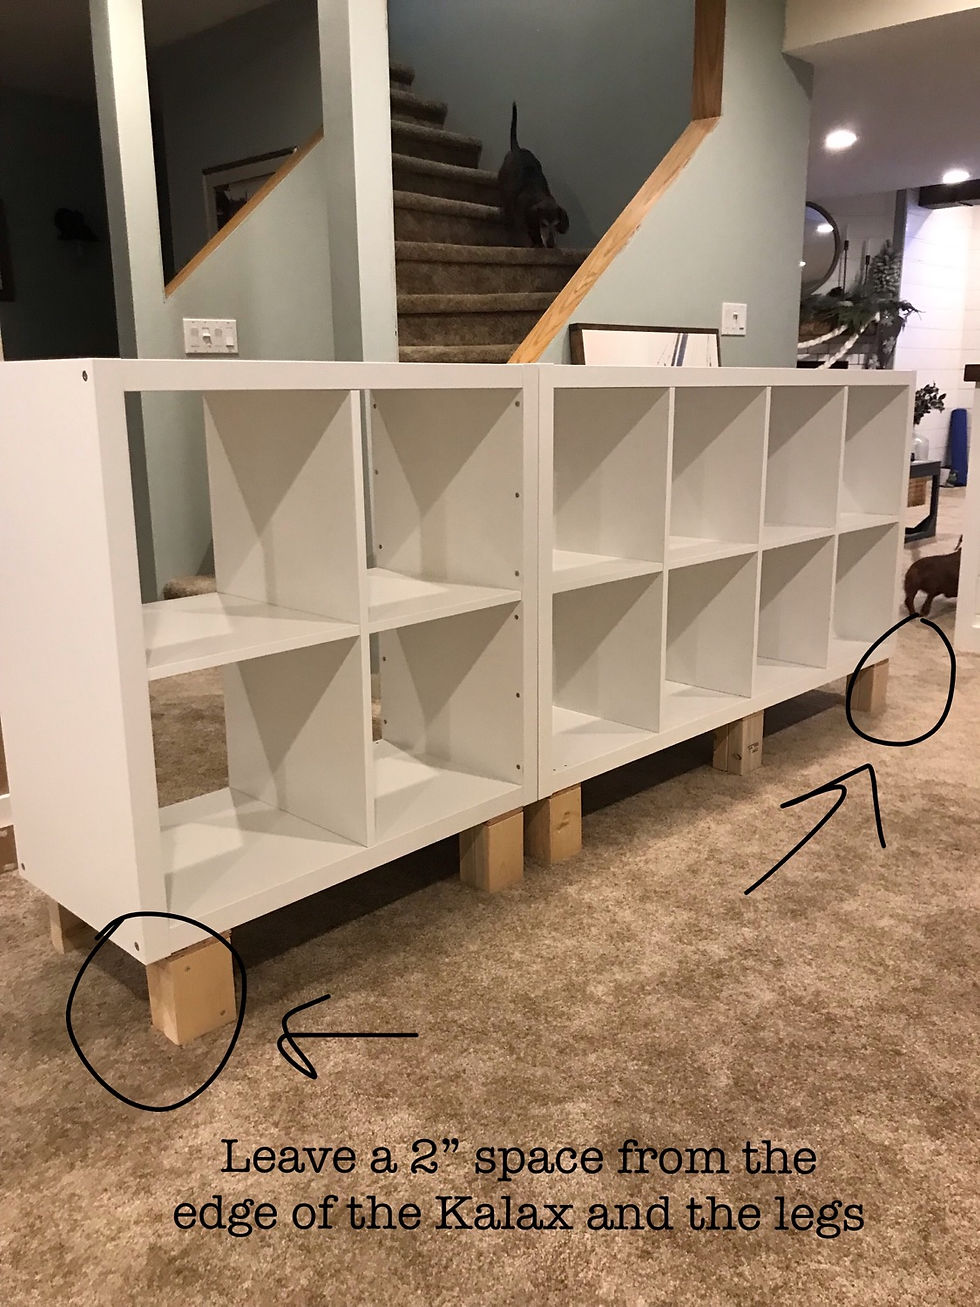
Now you can attach your feet onto the Kalax. We affixed our feet to the top of Kalax then flipped over the unit when we were done. To affix the feet we used our PL adhesive and applied it to the top of the plywood of our U shaped feet and then turned it around and glued them across 5 sections of the Kalax. Before you glue your feet down, make sure that the very end feet are 2" away from the edge. Now attach all of your feet spaced out to evenly support the weight of the unit. We also screwed down through the plywood into the Kalax for extra support.

Step 3:
After you have affixed your feet onto your Kalax units you need to stick the Kalax units together to make one long unit. To do this we tipped our 4 cube unit onto its side vertically and then applied a generous amount of PL adhesive onto the top, then we took our 4 cube unit and rested it on top of the 8 cube unit and on the adhesive. We allowed that to fully dry over night.
Step 4:
After your PL has fully dried you can close in the back section of the unit. Now what we used for this was tongue and groove flooring to close in ours, but that's because its what we had leftover from our basement bar. You could use plywood as well or bead board. I will say I really like the tongue and groove look, it adds a pretty feature at the back of the unit, but we hardly even see it because of the baskets being in the way, so be sure to use whatever you like. Curtis used PL down the cross sections of the Kalax and then used his Brad nail gun to attach the flooring to the back.


Step 5:
Now in the image above you can already see where that 2x4 board went in the 2" gap at the end of the legs. We just screwed this 2x4 directly into the legs.

Step 6:
Next thing we did is apply our MDF base board all around the bottom of the Kalax. Using our Brad nailer we nailed the MDF into the legs. Our baseboards are 5 1/2 " wide.
Step 7:
It's time to make your wood top now. Your Kalax top is going to be 15 3/8" deep. Basically all you need to do is get some 1" pine boards (or thicker if you want a bigger top) to go across to fit that depth. We used a few 1x6" boards and then put another board through our table saw to make a more narrow piece to fit towards the back. I would suggest to figure out what size boards you want to use for your top and then get them cut at Home Depot to fit the depth of your Kalax.

Step 8:
To finish off the wood top, we capped a 1x2" piece of wood around the edge of the boards to give it a thicker look with our Brad nailer.

Step 9:
Next you need to make attach a side piece on each end of the Kalax. This is needed so that when you attach your gate hinges there is real wood for the hinge to screw into. Measure your sub floor pre-sanded plywood to fit the side and attach it using your PL and your Brad nailer.

Step 10:
Once your sides are done, you will be making your gate swing doors. First measure your plywood to fit and cover 4 cubes on each side of your Kalax. We used plywood, but I will say it leaves a more rustic finish once it's painted. If you don't want that look, I would suggest you use MDF which will give you a smoother more polished finish.

Step 11:
Once you've figured out the size you need your gate doors to be you will start to add the trim work to the fronts of your doors. What we used for the trim work is our extra 4mm pre-sanded plywood cut at
3 1/2" wide. We first attached the outer trim to frame the gate door using our Brad nailer. Then we made the cross X sections simply by taping down the wood and then marking with a pencil where we would need to make our cuts.


Step 12:
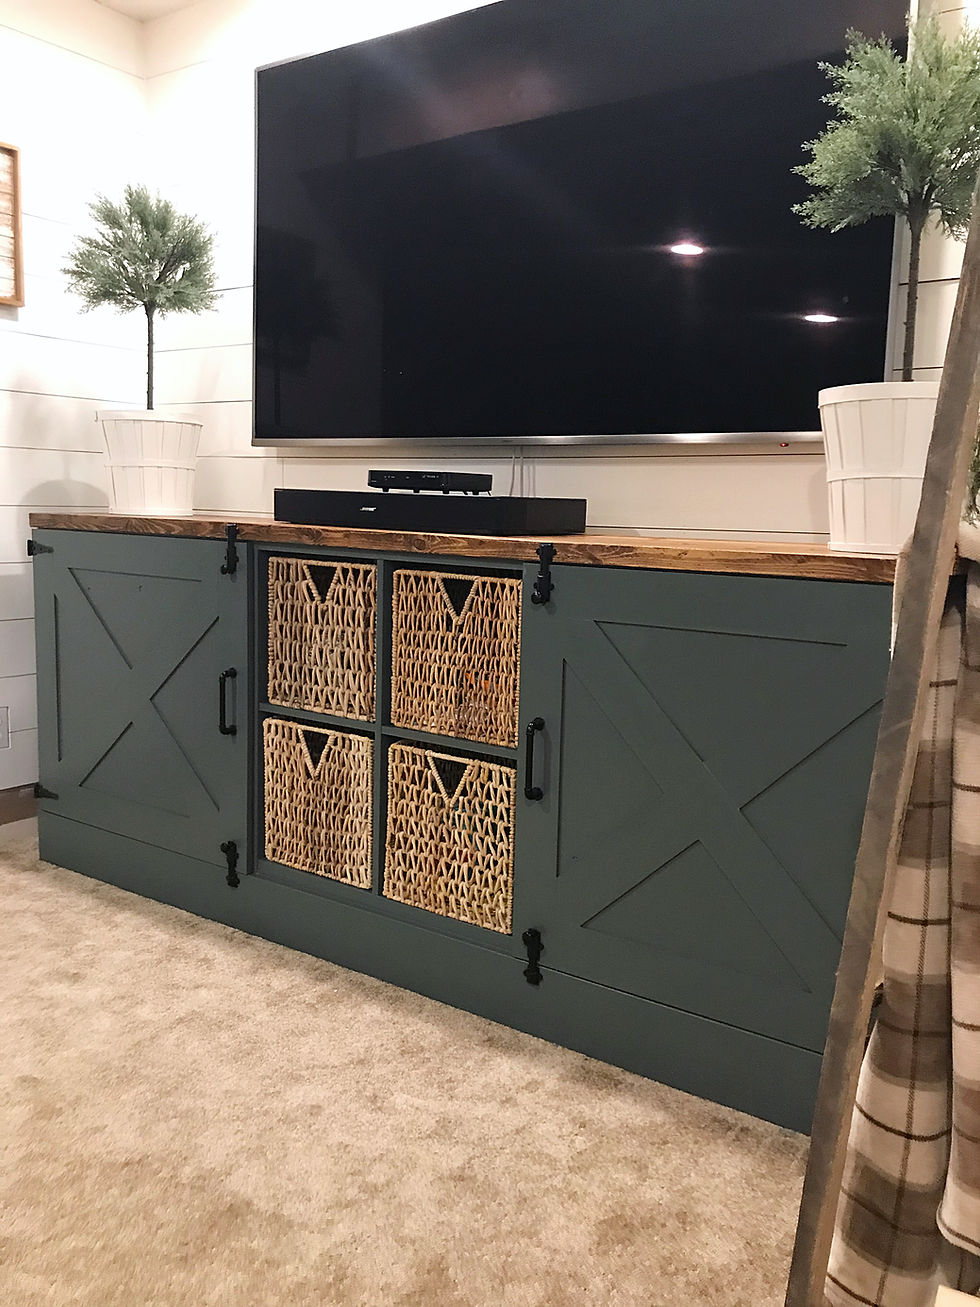
All your trim work should be on your doors by now and here's the time you should actually paint your doors. I painted mine while they were hung, but I always get two steps ahead. I suggest to paint first then hang (so don't do what I did as shown in the pic below). So let's talk painting this piece. I picked Sherwin Williams Woodland Lichen which is a pretty soft sage green colour. I decided to use chalk paint on the entire unit. I put the chalk paint directly on the doors, base trim and outer walls. On the inside 4 middle cubes where I'm actually painting directly onto the Ikea glossy laminate I sanded first, then did two coats of Bullseye 1-2-3 primer followed by 2 coats of my own chalk paint (recipe below). I decided to not paint on the inside of the other 2 sets of 4 cubes because they are covered with the doors.....and well I am just lazy sometimes, haha!


I always make my own chalk paint because it's way cheaper than buying pre made chalk paint and it takes nothing to make your own.
DIY Chalk Paint Recipe:
2 1/2 tbsp. of Plaster of Paris
1 1/2 tbsp. of cold water
1 cup of latex paint (I use eggshell or semi gloss even)
*Mix together your plaster of paris with your cold water until NO lumps! Then thoroughly mix this into your 1 cup of paint. Continue to occasionally stir your chalk paint while in use so that it doesn't get any clumps. Keep it in an air tight container. I like to use old yogurt containers.

After your primer has dried on the interior 4 middle cubes of your Kalax you will paint on 2 coats of your chalk paint with your paint brush. I found I only needed 2 coats. You may need more depending on what colour your choose. Once all my chalk paint has dried on the entire unit I fully sealed everything with 2 coats of my Minwax Polycrylic.
Step 13:
Above you probably already saw I shared pics of my stained wood top. I stained the boards in Minwax Early American and then later decided to add another coat of Special Walnut to darken it up a bit. After the stain fully dried over night, I sealed the top in my Minwax Polycrylic with 3 coats in total.
Step 14:
We noticed our doors did not want to fully close, this is probably because we used plywood rather than MDF, and well... we are not expert cabinet door makers, so not a big shocker there! This actually worked in my favor though cause after looking through Pinterest I saw the most beautiful media cabinet built by Shades of Blue Interiors where she had added some gorgeous decorative surface bolts to her doors. I fell in love with them as soon as I saw them, and much to my delight I saw that they are actually available at my local Home Depot!! So off we went to get the bolts! We attached them to the upper wood top and the cabinet doors and they work perfectly to hold closed both doors.


Phew! I know it may seem like a lot of work and steps guys, but this is not a hard project! Basic cuts using some basic tools! So, what do you guys think!? It's all done now.....don't you think it looks so pretty!? This piece measures in at 89" wide and 36" tall! It's a beast you guys! It fits so perfectly and looks very proportioned under our large TV now.

I added these 4 wicker baskets from Ikea to the middle. Ikea has a great selection of baskets to fit their Kalax units. I hear these particular ones are no longer available, but here you can find a lot of other options. Pretty much anything with the cube shape from Ikea is meant to fit in the Kalax squares.

Well guys let me know what you think!? As always I would love to hear your comments below or ask any questions you may have on this DIY Ikea media unit hack.
Thanks for stopping by!
Love,
Dale


PAUTOTO
PAUTOTO
PAUTOTO
PAUTOTO
PAUTOTO
SUPTOGEL
SUPTOGEL
SUPTOGEL
SUPTOGEL
SUPTOGEL
BANTOGEL
BANTOGEL
BANTOGEL
BANTOGEL
BANTOGEL
GUATOGEL
GUATOGEL
GUATOGEL
GUATOGEL
GUATOGEL
LAMTOTO
LAMTOTO
LAMTOTO
LAMTOTO
LAMTOTO
LPG888
RAPTOTO
SlotGacorGuide
SlotGacorGuide
qfscoin qfscoin
dnsbtc dnsbtc
qfscoin qfscoin
dnsbtc dnsbtc
paxmining paxmining
paxmining paxmining
cm miner cm miner
golden mining golden mining
optominer optominer
EarnMining EarnMining
ri mining ri mining
qfscoin qfscoin
dnsbtc dnsbtc
qfscoin qfscoin
dnsbtc dnsbtc
paxmining paxmining
paxmining paxmining
cm miner cm miner
golden mining golden mining
optominer optominer
EarnMining EarnMining
ri mining ri mining
qfscoin qfscoin
dnsbtc dnsbtc
qfscoin qfscoin
dnsbtc dnsbtc
paxmining paxmining
paxmining paxmining
cm miner cm miner
golden mining golden mining
optominer optominer
EarnMining EarnMining
ri mining ri mining
qfscoin qfscoin
dnsbtc dnsbtc
qfscoin qfscoin
dnsbtc dnsbtc
paxmining paxmining
paxmining paxmining
cm miner cm miner
golden mining golden mining
optominer optominer
EarnMining EarnMining
ri mining ri mining